How to (hopefully) get Multi-Channel Audio working on Windows
I’ve spent a significant amount of time trying to get Multi-Channel audio working on my setup, but before you read even further: It’s janky as heck… Please don’t get your hopes up too high, especially if you’re trying to get near latency-free audio out of it. You might be lucky, or you might end up like me who spent hours after hours just to get down to ~100 ms of delay…
That said, if you’re as uneducated as I was before all this and want a “quick recap” of how things work: S/PDIF / Toslink (or simply just your usual optical cables) can only carry 2 channels uncompressed. In order to get multi-channel audio to work over them it has to be compressed, that’s where DTS or Dolby come into play. Compression means delay, if your Soundcard doesn’t already come with a built-in function to compress that audio you will always introduce some kind of latency into your setup. The below mentioned method of patching the Realtek driver to force-enable that function will only add a very tiny amount of additional delay, but in my case I already noticed it enough to not deem it feasible for everyday usage. Even soundcards which already have that functionality out-of-the-box will have some form of delay, so playing something like “Hi-Fi Rush” or other rhythm-based games is going to be a nightmare… Please just spare yourself some hassle and stay analog.
DISCLAIMER: I’m just some random, non Hi-Fi guy! I could tell you something wrong here due to me not being anywhere near of an expert about any of this! Please take things with a grain of salt and if something doesn’t work let me know in the comments below and I’ll try to fix it! Thanks!
The easiest way: Analog
Yeah, not kidding. If you want the easiest solution without any hacking or patching required, can bear a few bucks and your sound card + receiver already has plugs for it please do yourself a favor and go get a proper 6 channel audio cable (or 3x AUX cables). It’s the easiest and least janky solution out of everything that will be listed below and is most likely already supported out of the box by both your motherboard and installed driver. No hacking, no patching, no manual driver de- and installations and most games should detect it properly too.
Update as of August 2023: I’ve been using analog cables for my 5.1 setup for a few months now and it’s honestly so SO much better than all the other solution I’ll show below. No weird driver hacking required and all games just instantly recognize my audio setup. This was honestly worth every cent I’ve spent on those cables!
The Painful Way 1: HDMI
Well it seems you chose pain… If you have a NVidia card (potentially even AMD) and want to get multi-channel audio working there is a way, however for me it didn’t work right the first time around. This method will also wipe any changes you did to the audio driver every time a general driver update comes around, so be prepared to update and patch a lot…
Thanks to sean0883 on Reddit who showed me this! If you want more info or the whole conversation about this method go check out the link.
What you’ll need:
- HDAudio.zip (Backup Download) from fatguy over at tenforums
- 5.1 Audio Test File (optional but recommended)
Step by Step:
- Download and unpack the above ZIP file
- Start by opening the “apo_driver_setup_x64.exe” file
- Choose the following options and press “Next” (ignore all the other things, they won’t work properly anyways!):
- FX Configurator
- Dolby DS1 7.6.5.1
- Once finished open the newly installed “FX Configurator” from the Start Menu
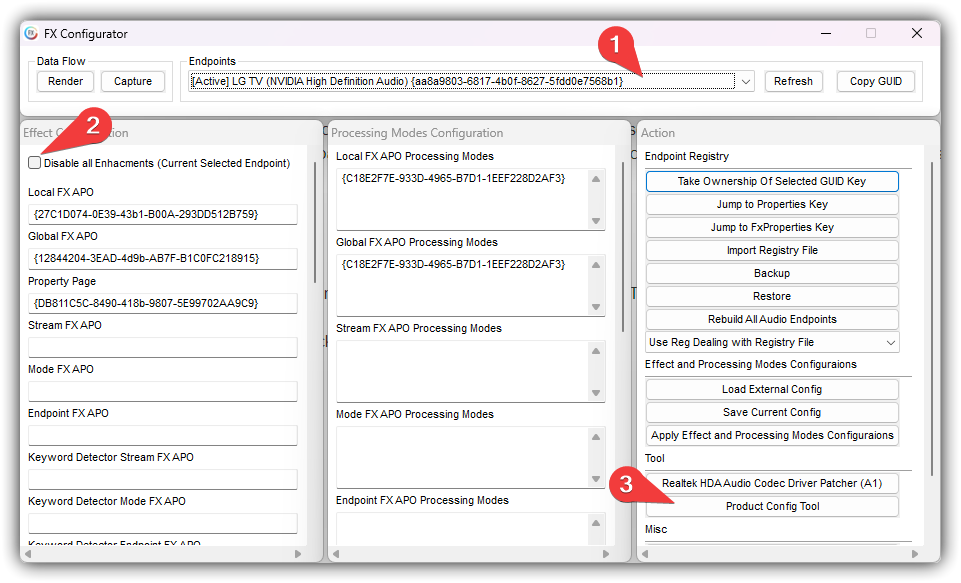
- Choose the device you want to patch at the very top > uncheck “Disable all Enhancements” > on the very bottom right choose “Product Config Tool“

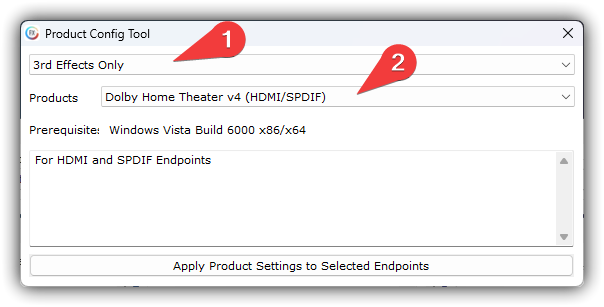
- Choose “3rd Effects Only” and “Dolby Home Theater v4 (HDMI/SPDIF)”

- Then click on “Apply Product Settings to Selected Endpoints” and wait till the Windows audio service reloaded
- Afterwards install “DolbyHomeTheater.msi” from the unpacked ZIP archive
- Go into the old Windows audio settings (Windows + R > “mmsys.cpl“) and search for the device you just edited, right click and go to “Properties“
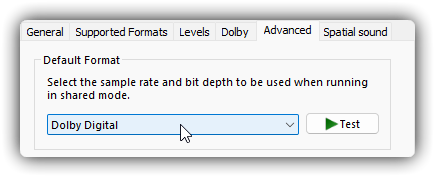
- You should now see a “Dolby” tab. Don’t worry if it appears broken, it doesn’t have to work. Go to the “Advanced” tab and select “Dolby Digital“, then close everything.

If you’re lucky you should now get 5.1 audio to your receiver! You can test it with the file linked above.
If it doesn’t work or you get an error that “Windows can’t play audio” try to do all the steps again, worst case reinstall your GPU driver to get everything back to stock (tho I recommend using something like “Display Driver Uninstaller (DDU)” before reinstalling your drivers). I also needed 2 tries to get this working.
The Painful Way 2: SPDIF/Optical
The even “more painful” way… If your setup doesn’t include a TV in the middle and you want to go directly from your PC to your receiver via a SPDIF/Optical cable you need to patch the Realtek driver in order unlock all modes. These are locked down by default due to licensing… yeah, welcome to the world of patents making your life painful :)
This still introduces a lot of latency, but was less noticeable than the HDMI method shown above. You still won’t be able to play Rhythm-heavy games tho… so beware.
Thanks to MHzBurglar on Reddit for this quick guide!
What you’ll need:
- Realtek Patcher (Backup Download) aka “Pihato’s Patch” from Techpowerup
- Password simply is “realtek“
- Virustotal and Windows Defender might report a false positive here! However there will always be a risk, so continue on your own behalf!
- Realtek Driver v2.82 64bit (Backup Download) – Please do yourself a favor and use the Backup Download, official Realtek servers are soooo damn sloooow…
- Display Driver Uninstaller (DDU)
Step by Step:
- Download the Patcher, Driver and DDU from above and unpack them
- Install the Display Driver Uninstaller (DDU)
- Reboot Windows into Safe Mode (How To)
- Open DDU, on the upper right choose “Audio” > “Realtek“, then click on “Clean and Reboot“
- Disable/Unplug your network cable, else Windows will automatically download and install the standard Realtek driver before you have any chance to install the above one!
- Once your System rebooted start the Patcher, browse to the files it asks for and let it do its thing
- After that start the driver setup and click through everything as you normally would, accept the “Unsigned Driver” warning window
- Reboot once again
Voila! You should now see all the other available options in the Windows Sound Settings! If you still don’t see any new options try another reboot, else try the above steps again.
Some final words…
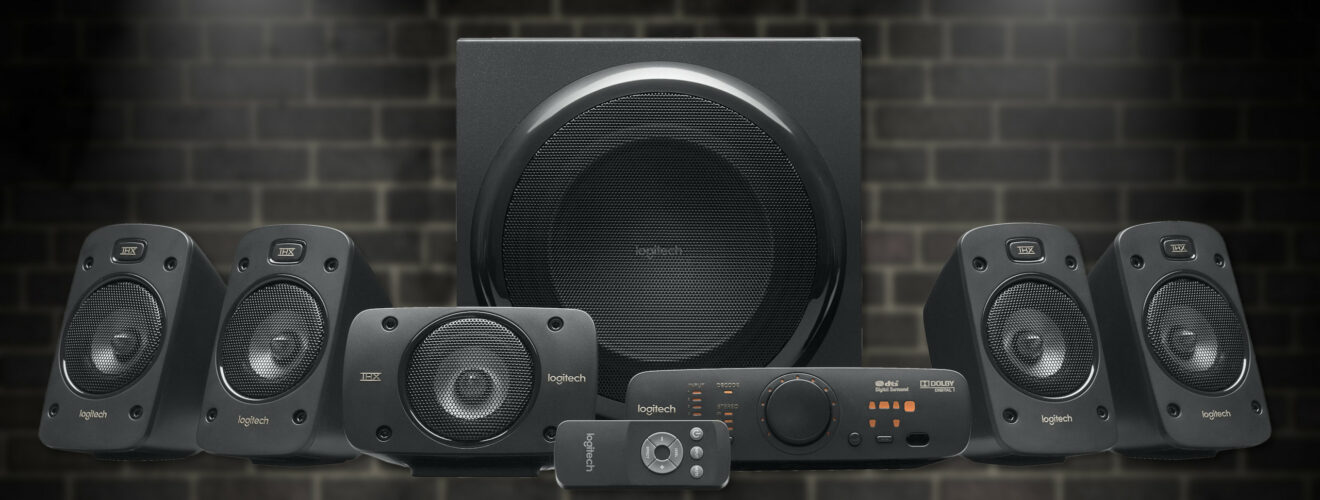
I’ve been using the hackish methods via HDMI and SPDIF for a couple weeks until I was fed up enough with the delay… even watching a movie wasn’t fun, you notice the delay instantly. You can correct it a bit of course, but switching over to games there’s not much you can do anymore. I’ve since switched my setup to analog cables and ran them across my whole room, but I’d do it again in a heartbeat knowing how much pain the other methods are. The bass response is also a ton better than over digital for some reason, my Logitech Z906 sounds a heck of a lot better analog then feeding it anything digital, tho that might also be down to its internal amplifier.
Anyways, hope the above methods worked for you! If you have any questions or improvement notices please leave a comment below!

Recent Comments